Showing posts with label tutorial. Show all posts

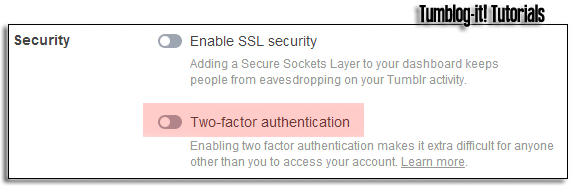
How to activate the Two-Factor Authentication (security)


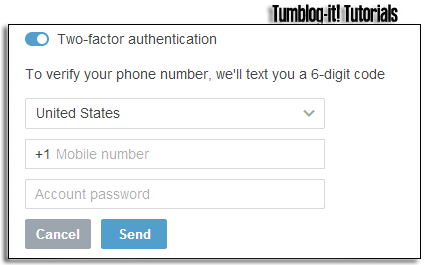
Hello everyone! On March March 24, 2014 Tumblr announced a new security system called Two-Factor Authentication that will improve the security of the Dashboard. This new feature will provide a more safe and fun! tumblr experience. Don't know how to activate it? I have a simple tutorial that will help you with that.

Tutorial: Activate the Two-Factor Authentication
1. Visit your account settings.
2. Click the "Enable" checkbox.
3. Enter your phone number.
4. Now decide whether you'd like to receive the code via text or through an authenticator app. We recommend both in case you need to use one as a backup.
5. Follow the steps laid out in the settings page.


Reference: Information have been provide by Tumblr Staff and website.

Tutorial: How to change your Username


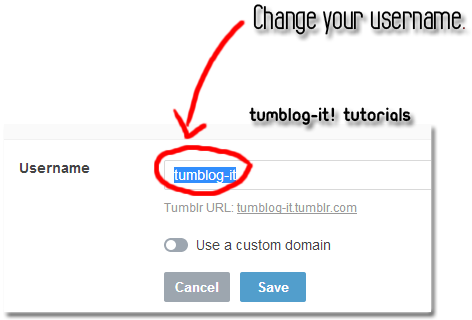
Hello Everyone! Ever wonder how to change your username? First, you must know that Tumblr shares the URL and username, so what does this mean? The URL that you choose for your Blog it will be your username. Here's a quick and super easy tutorial of How to Change your Username:

1. Go to your Account Settings. (top right-corner, the last icon)


2. A new table will come, find the option with the USERNAME. (first one) and change your user name, Tumblr will automatically save the changes.


Find Blogs of any category, Learn if you're friends use Tumblr and Search for people you wish to follow. How? Here's the tutorial!

 Hello Everyone! In this tutorial i will explain the "Find Blogs Option" -- wondering what is it for? The FIND BLOGS option allows you to :

1. Search per category any Tumblr blog : beauty, entertainment, culture, books, business, education and the list goes on.

2. Learn who uses Tumblr from you're friends in Facebook or Gmail.

3. It shows you how many people on Tumblr you're following. This option allows you to search ANY Tumblr blog using: the URL of the blog, username of the author / owner or by email.

Let's start the tutorial: 
- Where is the FIND BLOGS BUTTON?
First you must Log In Tumblr, on the right sidebar of you're screen find the option that says "Find Blogs" and click on it. 3 small options at the top of your screen will appear just like in this photo:


1. SPOTLIGHT - this option is the first one to appear once you click on the FIND BLOGS option. What is it for? It works just like a file directory, it stores all the blogs available for each category. The top popular blogs will appear with a photo just like "The New Yorker" from the example below.


2. PEOPLE YOU KNOW - Ever wonder how to know if you're friends use Tumblr?? Here's the option! Simply click on the Facebook or Gmail button and it will show you: the blog name, profile picture, name of your friend and the Follow button.


3. FOLLOWING PEOPLE: Last option and easy to use! Not only this option is available through FIND BLOGS button, but it also appears in the Dashboard of your Tumblr.


This option allows you to see the people you are following. It also gives you the option to search any blog using the URL of the blog, username of the author / owner or by email. 


Know the basics of Tumblr. (text and video)


Hello Everyone! New to Tumblr.com? or even if you a Tumblr User is always good to know the basics of "How to Tumblr". Tumblr bloggers just like you and me, have created tutorial websites, videos and even books of  How to make your Tumblr experience better. 

If you just discover the world of Tumblr here a few tips and videos that will help you understand how to "Tumblr":
• First know: What is tumblr?
• Tumblr is a new world for you, is always good to know the different terms and words that people often use for blogging. Tumblog-it! have created  - Tumblr Dictionary: Read, Learn and Discover the Tumblr World. 
• How to start? Here's a video from Youtube.com made by yin97825 and Nicki rayraynicki  that explains the basics of Tumblr.

TUMBLR 2013 VERSION


Tutorial: How to re-size a image? using HTML

Hello Everyone! For this tutorial I'm gonna teach you How to re-size a image? using HTML, the easy way! For a quick definition of what HTML means you can visit our Tumblog-it dictionary. Here's a image of what you will be doing in this tutorial, trust me is super easy!

• First step is Log in your Tumblr Account. (of course! who doesn't know that?)

• Tumblr allows you to customize your images using different tools, you can write a message or change your template, whatever your doing, find the option that allows you to use HTML. For example in messages looks like:

While in the Template customization looks like:


• Now COPY the following code, and PASTE it wherever you want to have the image:


• Replace MY IMAGE URL, the width and height of this example.
• If you have no idea how to size your image, I made a few examples:


 (width) 100x100 (height)

 (width) 200x250 (height)

 (width) 400x250 (height)


Tips: Just play with the numbers till you reach the perfect size that you wish for! Let us know if this tutorial was helpful by clicking on the check-boxes below. Thank you.

Tutorial: How to Queue in Tumblr. Keep your Blog Active and Consistent.

Hello Everyone! Sometimes we cannot log in on Tumblr for some random reasons, but you feel like you want to keep re-blogging for all your followers. Ever have that feeling? Well I have great news for you, Tumblr allows you to Queue photos, text or anything else you wish. 

What does Queue means? 
Queue in Tumblr means to aline by date photos, text, quotes, audio, links or videos that will be posted later on. The queue lets you stagger posts over a period of hours or days. It's an easy way to keep your blog active and consistent.


Less read and more action! -- Let's start the tutorial.
• First we need to log in the Tumblr Account, find the blog you wish to add Queue photos, text, links, etc.

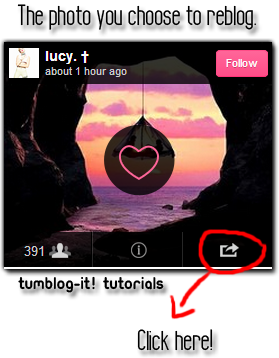
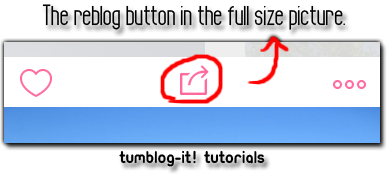
• To Queue something in Tumblr you must be Reblogging something from another user OR start a new photo, link, video, etc. Click on Re-blog to start your new work:


• Either your creating a new post or re-blogging from someone else, a new window will pop on your screen. Find the "blue box" option, like in the following picture.


• Choose the ADD TO QUEUE option. Once you choose it, click on Queue post, and you're finish. The post will be re-direct to your queue list. 

Tutorial: “You’ve been here __ times”


Hello Everyone! This is a quick tutorial of How to add the "You've been here ___ times". Enjoy!

Step 1: Copy the following code:


Step 2:
Go to your Tumblr Account.

Step 3: Customize your theme.
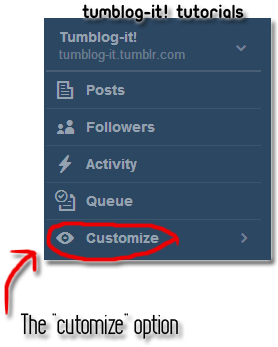
(Tutorial: Where is the “Customize Theme” Option?)

Step 4: Edit HTML and Paste the code where you want to have it.

Step 5: Click on "Update Preview" and if you like it click on "Save" then "Close". You're finish!

[special thanks to: Camila for the code]

Tutorial: How to Re-blog from We ♥ it!


What's We ♥ it? 
We ♥ it, is a website that allows you to collect your favourite images and share it with everyone (and is free)! including Tumblr. This website have become one of the best photo-search tool for many bloggers, and here's why, let me teach you "How to Re-blog from We ♥ it!"

1. FIRST you must know that:
- You must be log in your Tumblr Account.
- You don't need to sign up in We heart it.com to reblog photos/images.

2. Visit their website Weheartit.com and look for the Search option. Type any topic you wish to see, for example I will type "landscape".


3. Click enter on your keyboard or the search button and a all the photos related to "landscape" (the word for this example) will appear.To re-blog a photo you like, click on the right-side icon (not in the heart) and a new window will open. It will ask you to choose between Facebook, Tumblr or Twitter. Choose Tumblr.

Too see the picture at the original size simply click directly on the photo.


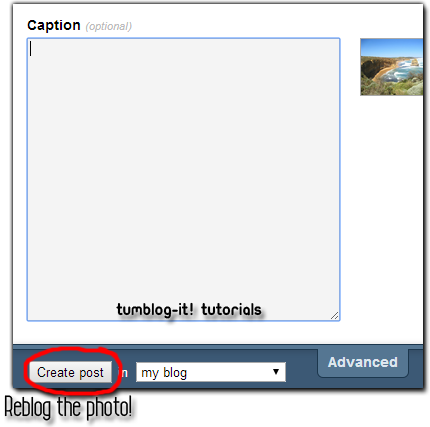
4. Once you choose to re-blog the photo on Tumblr a new window will open. Look at the bottom of the window and click on "Create Post". The photo will instantly upload in your Tumblr blog. Visit your Dashboard and the picture will be there.


Welcome to Tumblog-it! Backgrounds Library!


Hello Everyone! Imagine you like a background for your Tumblr blog, but can't find it again? Tumblog-it have created a full Library FREE of use for you. Discover all the backgrounds available! 

Click HERE to see the full Library!

HOW TO USE THE LIBRARY: 
1. Click on the arrow from the left-side column and you be able to see all the Backgrounds FREE for your Tumblr Blog!


2. So you want a background? What to do? Click on the background you wish and on the right-side of your screen find the LINKS available for the photo:


3. Click on the code, and it will automatically copy the code and paste it on your blog. 

Copyrights: We do not take any credit for any background FREE and public to use for Tumblr Users. If you're the owner of the background image and do not wish you publish it - send us a message HERE. With the category and description of your background.


Tutorial: How to add "Read More" when Replying / Answering someone

Hello Everyone! I made a tutorial that allows you to add the option "Read More" when creating a Post of any type (photo, text, quote, etc) but what happens when you have to Reply or Answer someone who writes you a private message. Where is the "Read More" option? There's none!

Let me teach you how to add the "Read More" when Replying or Answering someone.


• First you must be Log in you Tumblr Account.
• On your Dashboard find the INBOX button on the top corner of the Tumblr page and click on it.


• Once you open the message, you'll notice there's no "Read More" or "Page Break" icon. What to do?
1. Type your paragraph. Add a photo and do everything normal. Now when you want to add the "read more" find the HTML option, like in the following photo:


2. Where you want to add the "read more" add the following code: <p>[[MORE]]</p>


3. Now click on the UPDATE at the end of the window.
4. Now on the message window you'll see the "Read More" option. Like the photo below: Click on Publish and you're done!


Tutorial: How to Like a Post. You like a post? added to your "Like List"

If you like it - just hit the LIKE button! No, seriously if you like a post why don't you make it one of your favourites? For this post I am gonna teach you How to like a post. Sometimes you like the photo or text so much that you don't wanna let it go, let me teach you how to make it a "favourite" on your Tumblr. And is very easy! 

First of all, when you "LIKE" a post, Tumblr will added to your "favourite post list". Let's start by:

- - - - - - - - - - - - - - - - - - - - - - - - 
How to like a post?
- - - - - - - - - - - - - - - - - - - - - - - -

Step One: Log into you Tumblr Account.
• Find the post that you like, and on the top right you'll see a little heart-shape icon.


• Simply click on the heart and you be adding the post to your favourite list. 


• But how can you find your LIKE list? Easy! To find your LIKE list simply search under your Blog name, where it says "Like # of Posts" click on the option and it will take you to your favourite posts. Happy Blogging!


Tutorial: How to make a Screenshot? Easy!

Hello everyone! You want to make a screenshot but have no idea how to do it? Let me teach you the easiest way to do it! and you be taking screenshots everyday - yes is that easy!


• First Step. Once you have choose what you want to ScreenShot press the key "PRINT SCREEN" or "PRTSCN" it depends how is written on your keyboard.

• Now open your PAINT program and PASTE the image. Wait I have no idea how to paste a image? No worries simply click CONTROL + V or find the icon that says paste. The paste icon always look like a small notebook, something like this:

• Do you see the image? But wait we gotta clean the borders, nobody want to see all your tabs and open windows, you can:
1. Select the ERASER option and start cleaning all the corners that you do not wish to have.
2. or you choose the SELECT option if you want to delete bigger pieces of the screenshot.


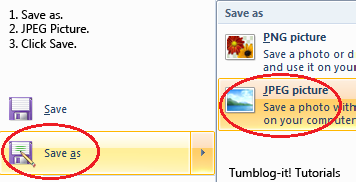
• Once you have clean everything. SAVE the work as a JPEG picture. Ok, we have the picture but how am i gonna added to Tumblr? 


Just click on the Photo Option from your Tumblr Dashboard and Choose the File of the image. Tumblr allows you to add text if you want on the post also. 

[You can use Tumblr to add the screenshot on your blog]

[choose the file and you're done!]
• Now just click Create Post and you have the screenshot on your Tumblr Blog!

Fun tricks and tips: Fish for you blog!

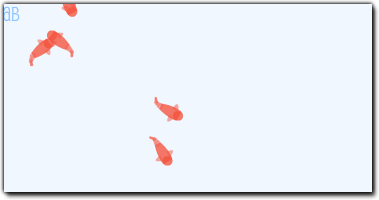
When I first saw this cool animation I was like: How cool is that? How can you add this lovely fish in your blog? Is perfect for those who want to give a relax mood to their blog, or for those who have Inspiration Photography Blogs. But the Question is "How can I get them?" Easy let me show you!


Tutorial: Fish Pond for your Tumblr Blog
First let me annouced that this tutorial is from http://abowman.com awesome gadgets. Visit their website for more cool tricks and gadgets. Tumblog-it! doesn't take any credit for this HTML code.

1. Now let's start! First you must Copy the HTML code in the website HERE.
(Copy the first one like the example below)


2. Log into your Tumblr Account.
3. Find the Blog Settings and Customize Theme.
(If you don't know how to find the Customize theme you can visit our TUTORIAL)


4. Now that you found Customize Theme option, click on EDIT HTML and Paste the code wherever you want to have the lovely fish pond. You can also Added on the Description Option. 

5. Click Update Preview to see how the pond look like, you can always change it to top, down or side bar. If you like how it looks like click on SAVE then CLOSE. Visit your blog and enjoy the fish pond!