Showing posts with label info. Show all posts

Blogs and Websites: Olle Ota Themes


Tumblr Name:  Olle Ota Themes
Website: http://olleotathemes.tumblr.com/

Main features: Olle Ota Themes is a Tumblr blog that offers popular, unique and very creative themes for free. The themes are made in HTML, CSS and JavaScript, the main feature? well free themes of course! If you wish to learn more about the author Aaron you can simply visit on the link "About".

RANK DETAILS
User support: Yes
Free themes: Yes
Creative and Unique themes: Of course!
Friendly User Interface (easy/hard to navigate on the blog): Easy
Presentation: Good
Rank

Tumblr Comments: This is one Tumblr blog you cannot miss to visit! The free themes are simply beautiful. If you have any doubts, suggestions or questions you can visit their "support" page. Photos / Examples below.


|Actual themes & info credit belongs to the author, our previews are non-credit and free to the Tumblr community to help and bring tips to those in need|

Blogs and Websites: Zen-Themes


Hello Everyone! One of the best things in Tumblr is that allows you to connect and share ideas with everyone. Here are one of the blog/website I recommend for today! why? This websites/blogs are helpful and always on-date for the Tumblr users.


Features: Just like the web describes, Zen-themes is a Tumblr Blog that offers FREE minimalistic
tumblr themes. The blog is friendly user (super easy to navigate) and it consist in 4 parts: Home, Themes, Help (the website offers a variety of tutorials) and Creator (designer information).

But what exactly is minimalistic? Minimalism describes movements in various forms of art and design, especially visual art and music, where artists intend to expose the essence or identity of a subject through eliminating all non-essential forms, features or concepts. Minimalism is any design or style is simple and only a few elements are use to create the maximum effect.

Themes: The themes are lighter, white base layout, it includes 4 previews of each theme. Simple to Install on your Tumblr blog (copy-paste tool). Zen-Themes currently offers 10 minimalistic themes, and the author allows questions using /ask option.

Tumblog-it! rank: This is a promising website, I hope they add more themes/layouts. If you love minimalistic themes, this website will go in your favorites.  More photos below.


Tutorial: How to Queue in Tumblr. Keep your Blog Active and Consistent.

Hello Everyone! Sometimes we cannot log in on Tumblr for some random reasons, but you feel like you want to keep re-blogging for all your followers. Ever have that feeling? Well I have great news for you, Tumblr allows you to Queue photos, text or anything else you wish. 

What does Queue means? 
Queue in Tumblr means to aline by date photos, text, quotes, audio, links or videos that will be posted later on. The queue lets you stagger posts over a period of hours or days. It's an easy way to keep your blog active and consistent.


Less read and more action! -- Let's start the tutorial.
• First we need to log in the Tumblr Account, find the blog you wish to add Queue photos, text, links, etc.

• To Queue something in Tumblr you must be Reblogging something from another user OR start a new photo, link, video, etc. Click on Re-blog to start your new work:


• Either your creating a new post or re-blogging from someone else, a new window will pop on your screen. Find the "blue box" option, like in the following picture.


• Choose the ADD TO QUEUE option. Once you choose it, click on Queue post, and you're finish. The post will be re-direct to your queue list. 

Tumblr Upgrade: The Reblog Option

Click on the photo to view larger.

Hello Everyone! On January 25, 2013 Tumblr Staff officially release their new upgrade that will allow users to have an easier and fun experience with Tumblr. Here's a quick image of how the Reblog works.

An upgrade, years in the making…
When we imagined Tumblr more than seven years ago, we dreamed of offering creators a new canvas. Every post would be a raw look through the author’s eyes and mind. We imagined the interface disappearing as these subjects came to life.

For years, this vision was challenged by limits in browser technology and an increasingly daunting set of Tumblr features to support. But today, we take a huge step.
After months of careful crafting, we’ve reduced creation on Tumblr to its essence, while carrying over every single feature and making room for some BIG new ones (like completely customizable drag-and-drop photoset creation, faster uploads, and inline reblogging!). We can’t wait for you to try it.

Ok, so what's new? 
• Faster Reblogging.
• A new Reblog settings that allows you to Custom the URL, content and date.
• Language (you be able to choose different languages now)
• The Strikethrough option for you paragraph. (Example)

The upgrades have started rolling out and will be available for everyone already. If you have any issues make sure to contact them at the Help Center.


Tumblr Tricks you must now! - Part #1


Hello everyone! Here's a few tricks that will surprise you! If you didn't know now you can show your friends how make Tumblr even more easy. Hope you enjoy it!

• Did you know you can RE-BLOG without opening the actual post?
Click ALT+ and the word REBLOG on your Tumblr  and that's it! The post will be re-blog in one-click.

• Do you know what's a Hashtag?
Hashtags are words or phrases prefixed with the symbol #, is a short message used on social networking (aka. Twitter, Tumblr, Facebook, etc) that can be tag with any word.

• Did you know you can use your KEYBOARD to navigate on Tumblr?
J  - scroll UP on tumblr
K - Scroll DOWN on tumblr

• Did you know you can UNFOLLOW and ASK a person without visiting their Tumblr blog?
Click on the portrait photo of the blog you wish to unfollow or ask something. A small window will appear with this options. 


• Did you know you don't have to Scroll UP on you dashboard to reach the first post?
This arrow will appear on your right-side corner at the bottom of the screen. Just click on it and it will automatically take you to the first post on your dashboard. No more Scrolling up!


Tutorial: How to make a Screenshot? Easy!

Hello everyone! You want to make a screenshot but have no idea how to do it? Let me teach you the easiest way to do it! and you be taking screenshots everyday - yes is that easy!


• First Step. Once you have choose what you want to ScreenShot press the key "PRINT SCREEN" or "PRTSCN" it depends how is written on your keyboard.

• Now open your PAINT program and PASTE the image. Wait I have no idea how to paste a image? No worries simply click CONTROL + V or find the icon that says paste. The paste icon always look like a small notebook, something like this:

• Do you see the image? But wait we gotta clean the borders, nobody want to see all your tabs and open windows, you can:
1. Select the ERASER option and start cleaning all the corners that you do not wish to have.
2. or you choose the SELECT option if you want to delete bigger pieces of the screenshot.


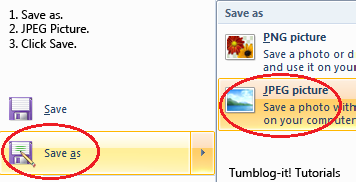
• Once you have clean everything. SAVE the work as a JPEG picture. Ok, we have the picture but how am i gonna added to Tumblr? 


Just click on the Photo Option from your Tumblr Dashboard and Choose the File of the image. Tumblr allows you to add text if you want on the post also. 

[You can use Tumblr to add the screenshot on your blog]

[choose the file and you're done!]
• Now just click Create Post and you have the screenshot on your Tumblr Blog!

"Random Tumblr Spam" Helpful Tips

Hello Everyone! I notice a lot of Tumblr users are having this "Random Tumblr Spam", the spam just "appears" on your blog and is extremely annoying. Here's a few tips to fight back this annoying pain in the lower back spam:

DO NOT click on the link the photo have. It you click on the picture it has a big chance of your Tumblr account getting hack. Also tell your followers to not click on the Spam photos.

• Contact Tumblr Support as soon as possible to fix your blog. Click HERE it will take you directly to the help support page. If you don't see the contact email, simply type "support" on the search bar.

• Change your Blog password. If you have more than one account, change their passwords also. Here are some ideas of how to choose a good password.

• Uncheck the "Let people look me up by this address" in the Blog Settings. How to get there? click HERE for the tutorial.

• On Blog Settings - the application tab revoke anything that looks suspicious.

• I don't know if this one will work but I read into it, and you can try it: "In your settings go to your blog name link on the left hand side then scroll down and locate the ‘Post by Email’ section. Click reset." by punkatheistmomma

• Delete all the "Random Spam Post" made.

I have contact Tumblr Support and yes - you must change your HTML theme.
"If your blog is showing a fake Tumblr login page, a fake age verification, or anything other than your normal blog theme, it is recommend it to change your theme. Click the Themes button. Choose a new theme. Click the Use button. And, click the Save button." - by Tumblr Support


Best Blogs for Themes - Page #2


Don't miss part one of: Best Blogs for Themes

Best Blogs for Themes - if you're looking for new themes. A great way to start is by:
• Use the Tumblr Searchoption. Type the word "themes" and everything related to themes will appear. Is a great and easy-to do option to find new themes and everything related to it.
• Google it! Google is you're best friend. Google "themes for Tumblr" and every website and blog - related to Tumblr and themes will show.

Here's a few good blogs- that created themes for your Tumblr.
• http://a--themes.tumblr.com/
• http://ramyeons.tumblr.com/
• http://baudelairedthemes.tumblr.com/
• http://detoulouse.tumblr.com/
• http://doucheywolf.tumblr.com/
 http://pondificent.tumblr.com/
• http://fukuo.tumblr.com/
• http://gyapo.tumblr.com/
• http://wolfclawed.tumblr.com/
• http://bbysoo.tumblr.com
• http://manatopia.org/
• http://mcpoyles.tumblr.com/
• http://ninpen.tumblr.com
• http://northerndawn.tumblr.com
• http://sakurane.tumblr.com/
• http://themesbyla.tumblr.com/
• http://crayoned.tumblr.com/theme
• http://sirbarton.tumblr.com/

If you have or know more theme-blogs let me know in the comments below so I can add them in this post. Thanks! Happy Blogging!

Note: Remember to always keep the credit of those who made the theme.

Tutorial: How to Remove your Dashboard Background

Hello Everyone! We all know how to Change our Background on Firefox and Google Chrome:
• How to Change your Dashboard Background
(for Google Chrome Users)
How to Change your Dashboard Background 
(for Mozilla FireFox)

But WAIT!? what if we want to remove the background? How can i bring back the old-blue Tumblr background? Easy! Here's a quick tutorial how to do it.

First Step is to Log in your Tumblr Account.
• Now I need to know which browser you're using: Google Chrome or Firefox?
• For Google Chrome users keep reading this part - if you're a FireFox scroll down to see the tutorial.


○                  ○                    ○

Google Chrome Users

• Visit your Dashboard Homepage. (www.tumblr.com). We need to be on Tumblr for being able to remove the background.

• Let's remove the background. To install any Tumblr background on Google Chrome you must have the extension called Stylish, on your top-right corner of the screen find the "button" with the Stylish logo. It look just like this:


• 
• Now CLICK on the Stylish Logo and a small-window will open. You will see all the backgrounds you have available to for Tumblr. Choose DISABLE to remove the background from Tumblr but it will be save on the Stylish extension. If you choose DELETE well -- it will be delete. 


• Whatever Option you choose (disable/delete) your Tumblr Background should be remove instantly. If it doesn't REFRESH your browser and see how you're back with the old-blue Tumblr. And you're finish! Good Job.

○                  ○                    ○

FireFox Users

• For FireFox users you must have the GreaseMonkey and the Stylish Extension, on the top right-corner of your screen find the Logo of GreaseMonkey extension, it should look like this:


• Choose the Option that says Manage User Scripts:


• A new window will open choose the option User Styles:


• In Stylish you will see all the backgrounds you have available to for Tumblr. Choose DISABLE to remove the background from Tumblr but it will be save on the Stylish extension. If you choose DELETE well -- it will be delete. 

(click on the picture for larger view)

• Now go visit your Tumblr Account, and you'll notice the background is gone. The old-blue Tumblr is back! Good job.


Tutorial: Where to Find my Queue Posts? How to change the time between queue posts.

On the previous tutorial, I was talking about How to Queue in Tumblr and for this one, let's explain How to Find your Queue Posts and How to change the time between queue posts.

First Step: Log in to your Tumblr Account
• Choose the blog that have Queue Posts. (This only apply if you have more than your main blog)
• On the Right-Side bar Find the Option that says "Queue", like in the following picture:


• The Queue will allow you to stack posts over a period of hours or days. You can choose the # (number) of posts you want to have per day and between 12am-11pm till 1am-12am. You can also choose your Timezone.

(click to view larger)


• After you're done choosing the time of your posts. Click on the SAVE button that will appear. And you're finish!

Tutorial: Add an Image Header on Tumblr (Technique #1 and #2)


Hello Everyone! Want to add a Image Header but just don't know how? There's 2-simple ways to do it.


First we need to make the banner/image we want to use. Using a program like Photoshop, Paint Shop Pro or even Paint will allow us to make the banner. If you don't have any programs to use, you can  make the banner on the following internet pages:

http://quickbanner.net/ (allows you to customize font, size and background of the banner)
http://www.flashvortex.com/ (ads-look-alike banner)

I will try to search for more available banner-maker websites, but till now I have only found those 2 safe websites. The other's activate Tumblr security system.

• Step 2. Once you have your banner using the website or program, we need to "upload" the banner to Tumblr. You can use: Tumblr upload static file or a free image host. If you don't know any here's a few FREE and safe image host you can use:
http://tinypic.com/
http://imageshack.us/
http://www.postimage.org/

• Step 3. Now we have the banner. Let's go add it to  your Tumblr Blog.
○ Log in your Tumblr Account.
○ Find the Customize Theme Settings. If you don't know how visit: Tutorial: Where is the “Customize Theme” Option? (New Tumblr Design!)

• Now here's the important part. There's 2 techniques you can use to Add a Image Header on your Tumblr Blog. Let's start with the simplest one, and if you don't like it, try the second one.

○                 ○                 ○

Technique #1
1. Copy the following code:
 <img src="url" alt="some_text"/>

2. Paste the code below your <head> tag.
3. Change the URL for you banner URL.
4. Click on Update Preview and see how it looks like. If you like it, click on Save then Close.


○                 ○                 ○
                                            
Technique #2

1. Find the following code on your theme:
<div id="title"><a href="/">{Title}</a></div>
(use Control + F to find it faster)
 
2. Replace that code with this one:
<a href="/"><img src="Header_URL">

3. Replace the Header_URL with your banner URL link.
4. Click on Update Preview and if you like how it looks like, click on Save then Close.

Now you have finish and should have Image Header on your Tumblr Blog. Happy Blogging!


Tutorial: Where is the “Edit Theme” Option?


Hello Everyone! Tumblr is constantly re-designing the user-dashboard or "interface", that's why it is important to always follow the updates and know where your options are! Tumbr change the Customize Theme option to Edit Appearance.


1. In your dashboard (main page) find the Account Settings on the right-top corner of your screen. The Account Settings is the last button, once you click find the Edit Appearance. 


2. Find the Website Theme and Edit Theme, and you're ready to start customizing your theme!


Tumblr Dictionary! from Tumblog-it!

Hello! I have been giving tutorials and links for everyone to help you improve the Tumblr experience, but I notice there's a lot of "tumblr words" people doesn't know about. I decide to make a Tumblr Dictionary so everyone can start knowing the most common words from tumblr.

What does re-blog means? What is a Post? and such. Please share this dictionary with anyone that is learning the Tumblr world. Remember to credit Tumblog-it for it! 


Tutorial: How to add the Previous/Next (codes) Navigation Buttons

Hello Everyone! Here's a quick tutorial on how to add the Previous/Next (codes) Navigation Buttons to your Tumblr Blog. It makes it easier to search the history of the blog.

This is how the buttons look .


1. First thing we need to do is COPY the following code:


2. Go to your Tumblr Blog Dashboard. 
• Customize Theme
• Edit HTML
• Now look for the code {Description} on your theme, you can use Control + F for a faster search.
• You will find more than one tag {Description} find the one that's related with your description.

3. PASTE the code after the {Description} tag.
4. Click on Update Preview to see how it looks like.

TUMBLR OFFICIAL NEWS

staff:
It’s Tumblr Tuesday! Here’s some Tumblr blogs we hope you’ll enjoy.
The Daily Forlorn
Paul Hornschemeier posts daily drawings of filmmakers, toys, Victorian beasts, authors, work in progress, and character actors from bygone TV, all in an attempt to map his own brain. Above: An internal self-portrait.
SHARK WEEK
The good people at the Discovery Channel love sharks so much that they’re celebrating the 25th anniversary of Shark Week this very moment!
Literary Jukebox
Daily quote from a favorite book, thematically matched with a song.
SciSpotlight: NYSCI News Digest
Updates on events and topics based on science, technology, and learning from the New York Hall of Science.
Contemporary Arts Museum Houston
The Contemporary Arts Museum Houston is a non-collecting institution dedicated to presenting the best and most exciting international, national, and regional art.
For more updates on what’s new, check the official New & Notable Tumblrsblog!

#3 Tutorial: Using a URL as a LINK on your posts

Hello Everyone! You have reach the final Tutorial on How to add Direct Links on a Post. For this step-by-step tutorial I will show you how to Add a URL as a Link on your post, Is super easy and the quickest technique of all three.

If you wish to see the other techniques, you can visit:
Tutorial #2 How to Make a Word Link within a paragraph
Tutorial #3 Full URL on your Post

LET'S START THE TUTORIAL:
1. This tutorial is alike the #2, you must first choose the text option. Create your paragraph or sentences.


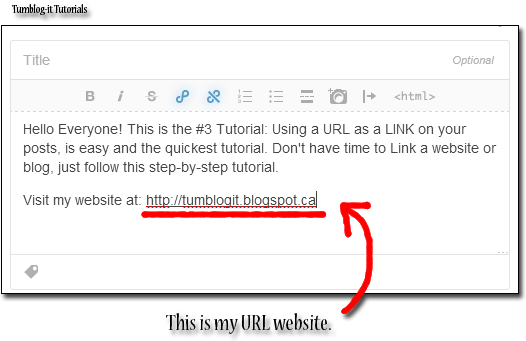
2. Now copy the URL you wish to share, and PASTE it on the Post. Here's an example:


3. To finish just click on Publish and you're done. This is one of the simple + quick ways of Links. It is used by most Tumbloggers, why? cause is super easy!

Tumblog-it! Tips: If your URL is to long it doesn't look appealing to the visitors, try the Tutorials #1 and #2 for a shorter link. 


#2 Tutorial: How to add a Word Link on your Post

Hello Everyone! This is the Tutorial #2 of How to add a Word Link. Is super easy and I be showing you step-by step how to do it. If you wish to visit our previous / next Tutorial on How to add a link just click on:

- Tutorial #1 How to Make a Direct Link Post
- Tutorial #3 Full URL on your Post

LET'S START THE TUTORIAL
1. In this tutorial you will learn to add a "Word Link" within a paragraph. What does this mean? It means when the person "clicks" on a word, he/she will be re-direct to another website or blog. Like the photo-example below:


2. To begin, you must create a paragraph, using the Dashboard option called "Text". Write your paragraph or sentences.

3. To Insert / Add a Word Link, you must select a text to do this simple double-click on the word or click where you want to begin the selection, hold down the left mouse button, and then drag the pointer over the text that you want to select.

4. Now that you have Select a Word, click on the "Insert/Edit Link Option" like in the photo below:


5. You're almost finish, now simply add the URL and Title of the Word Link. The title is the short-description that appears when your visitor hovers over the selected word. For example my description will say "This is Tumblog-it

Tumblog-it! Tips → Open Link a new Window → Recommended for visitors, easy friendly interface, allows the visitor to fast-navigate to another website without leaving your Tumblr blog.


6. To finish just click on "Insert Link" and you're Word Link is ready. If you wish to Link a complete sentence just follow the same instructions. Just Publish the Post and you have learn how to do a WORD LINK, good job!

Tutorial: How to make a Direct Link Post?


Hello Everyone! Since Tumblr is always up-grading and changing layouts (lol!) Tumblog-it! will keep updating the tutorials. To make a Direct Link Post there's 3 different options, but for now I will give you a tutorial step-by-step of the easiest way of making a Direct-Link.

If you wish to see the other techniques, you can visit:
- Tutorial #2 How to Make a Word Link within a paragraph
- Tutorial #3 Full URL on your Post

LET'S START THE TUTORIAL:
1. The fast + easy technique to Direct Link a Post is using the "Link Option" on your Dashboard. (your Tumblr homepage), the button looks like:


2. A small window will appear, like the picture below. If you add the URL (internet address) Tumblr will automatically give you the Name and description of the website/blog.

3. You can change the name and description if you don't like it. The "green name / box" is how the Link will be post on your Tumblr. Click on "Publish" and you finish. See how easy was that?


How to know the date and time of each post?

Hello everyone! Here's a quick and fun tips that most Tumblr Bloggers don't know. Now you can teach others if they ask you "where's the date of this post?" . If you want to know when the post (reblog or not) was made: it's easy! 

• Find the right-upper corner of a post, and you see those little tabs when you hover over them? It reveals the date and time the post was published. Easy right? Happy Blogging!

Here's the Example: