Showing posts with label posts. Show all posts

Daily Post Limit on Tumblr


Hello everyone! Sometimes you start re-blogging and suddenly you realize you have reach a limit? wait - there's a limit in Tumblr? Yes! If you're a re-blogger fan you must know that the maximum amount of posts per day is 100 text, 150 on photos and re-blog 250.

The limitation applies to any photo, text, music, videos, quotes and chat that you post on your Tumblr Blog. It also applies for re-blog posts of any kind. If you reach the limit the only action you're able to do is LIKE a post, unless you wait till 12.00 am for reset time. Here are some basic questions of the Daily Post Limit:

1. What Is Tumblr Daily Post Limit?
(Official Nov. 14, 2013 Update)
250 daily Posts (includes reblogs) of any type: text, photos, videos, chat, etc.
100 text posts
150 photo posts

2. When I Can Post Again?
Once The Daily Post Limit resets at 12.00 am (midnight). (24 hours)

4. Is there any way to know how many posts you have left?
Yes! There's a Tumblr Post Limit Checker made by underr8ted. (tumblr name) 
You can visit the website: HERE!

SHARE IT: This information have been taken from the Tumblr Tag Forum. If you have any more information to share about the Daily Post Limit please write us at Tumblog-it! and let's us know what we're missing. Thank you.

Tutorial: Where to Find my Queue Posts? How to change the time between queue posts.

On the previous tutorial, I was talking about How to Queue in Tumblr and for this one, let's explain How to Find your Queue Posts and How to change the time between queue posts.

• First Step: Log in to your Tumblr Account
• Choose the blog that have Queue Posts. (This only apply if you have more than your main blog)
• On the Right-Side bar Find the Option that says "Queue", like in the following picture:


• The Queue will allow you to stack posts over a period of hours or days. You can choose the # (number) of posts you want to have per day and between 12am-11pm till 1am-12am. You can also choose your Timezone.

(click to view larger)


• After you're done choosing the time of your posts. Click on the SAVE button that will appear. And you're finish!

#3 Tutorial: Using a URL as a LINK on your posts

Hello Everyone! You have reach the final Tutorial on How to add Direct Links on a Post. For this step-by-step tutorial I will show you how to Add a URL as a Link on your post, Is super easy and the quickest technique of all three.

If you wish to see the other techniques, you can visit:
- Tutorial #2 How to Make a Word Link within a paragraph
- Tutorial #3 Full URL on your Post

LET'S START THE TUTORIAL:
1. This tutorial is alike the #2, you must first choose the text option. Create your paragraph or sentences.


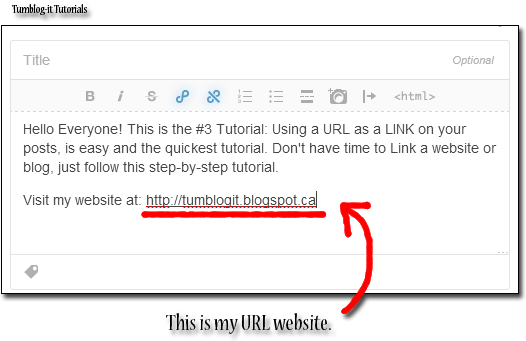
2. Now copy the URL you wish to share, and PASTE it on the Post. Here's an example:


3. To finish just click on Publish and you're done. This is one of the simple + quick ways of Links. It is used by most Tumbloggers, why? cause is super easy!

→ Tumblog-it! Tips: If your URL is to long it doesn't look appealing to the visitors, try the Tutorials #1 and #2 for a shorter link. 


#2 Tutorial: How to add a Word Link on your Post

Hello Everyone! This is the Tutorial #2 of How to add a Word Link. Is super easy and I be showing you step-by step how to do it. If you wish to visit our previous / next Tutorial on How to add a link just click on:

- Tutorial #1 How to Make a Direct Link Post
- Tutorial #3 Full URL on your Post

LET'S START THE TUTORIAL
1. In this tutorial you will learn to add a "Word Link" within a paragraph. What does this mean? It means when the person "clicks" on a word, he/she will be re-direct to another website or blog. Like the photo-example below:


2. To begin, you must create a paragraph, using the Dashboard option called "Text". Write your paragraph or sentences.

3. To Insert / Add a Word Link, you must select a text to do this simple double-click on the word or click where you want to begin the selection, hold down the left mouse button, and then drag the pointer over the text that you want to select.

4. Now that you have Select a Word, click on the "Insert/Edit Link Option" like in the photo below:


5. You're almost finish, now simply add the URL and Title of the Word Link. The title is the short-description that appears when your visitor hovers over the selected word. For example my description will say "This is Tumblog-it! 

Tumblog-it! Tips → Open Link a new Window → Recommended for visitors, easy friendly interface, allows the visitor to fast-navigate to another website without leaving your Tumblr blog.


6. To finish just click on "Insert Link" and you're Word Link is ready. If you wish to Link a complete sentence just follow the same instructions. Just Publish the Post and you have learn how to do a WORD LINK, good job!